Evo 3 inch lift opinions?

MericaMade

Active Member
The bolt on coil overs ride well on pavement but I'd have to argue that the Plush Ride coils are softer - if that's something you'd prefer.

Ok that is nice to know. Reality is I would probably never used the full potential of the coil over just really like the look. And are they really 100% bolt on or do you have to drill and cut a few areas?
 

Skeeterbait

New member
I just did the Evo 3" lift with king shocks about a month ago. Sitting on 35's. Very happy with it so far, only a 1K smiles on it.
-I did the stage 3, but it is not necessary. I just wanted the stronger control arms and johnny joints.
Very easy install, took me most of a three day weekend. Did it myself in my garage. Did wheels, brakes and fenders the weekend prior.
Some cutting and grinding for myself, because I also installed rockstars.

As Zimm stated, if going this route, dont forget the front driveshaft ( i went with a JE Reel 1350) and a draglink flip.

The EVO manufacturing webpage has all the instructions for their stuff. Read and re read them.
In the write up section are some write ups on front end alignment, setting up control arms and a full list of all the torque settings.
Hit all your nuts/bolts you will be removing the nightbefore with some PB blaster.
If you dont already have taller jackstands you will probably need them. I got a set of 12T off of amazon.
Get a paint pen and mark your bolts as you re torque them when you are done so you dont miss any.

after.jpg
 

catahoula

Caught the Bug
heres mine with evo 2 inch front and 2.5 ome in rear with 315s...tons of room for 35s

I just did the Evo 3" lift with king shocks about a month ago. Sitting on 35's. Very happy with it so far, only a 1K smiles on it.
-I did the stage 3, but it is not necessary. I just wanted the stronger control arms and johnny joints.
Very easy install, took me most of a three day weekend. Did it myself in my garage. Did wheels, brakes and fenders the weekend prior.
Some cutting and grinding for myself, because I also installed rockstars.

As Zimm stated, if going this route, dont forget the front driveshaft ( i went with a JE Reel 1350) and a draglink flip.

The EVO manufacturing webpage has all the instructions for their stuff. Read and re read them.
In the write up section are some write ups on front end alignment, setting up control arms and a full list of all the torque settings.
Hit all your nuts/bolts you will be removing the nightbefore with some PB blaster.
If you dont already have taller jackstands you will probably need them. I got a set of 12T off of amazon.
Get a paint pen and mark your bolts as you re torque them when you are done so you dont miss any.

View attachment 283288
Nice rigs!

Sent from my XT1080 using WAYALIFE mobile app
 

MericaMade

Active Member
I just did the Evo 3" lift with king shocks about a month ago. Sitting on 35's. Very happy with it so far, only a 1K smiles on it.
-I did the stage 3, but it is not necessary. I just wanted the stronger control arms and johnny joints.
Very easy install, took me most of a three day weekend. Did it myself in my garage. Did wheels, brakes and fenders the weekend prior.
Some cutting and grinding for myself, because I also installed rockstars.

As Zimm stated, if going this route, dont forget the front driveshaft ( i went with a JE Reel 1350) and a draglink flip.

The EVO manufacturing webpage has all the instructions for their stuff. Read and re read them.
In the write up section are some write ups on front end alignment, setting up control arms and a full list of all the torque settings.
Hit all your nuts/bolts you will be removing the nightbefore with some PB blaster.
If you dont already have taller jackstands you will probably need them. I got a set of 12T off of amazon.
Get a paint pen and mark your bolts as you re torque them when you are done so you dont miss any.

View attachment 283288
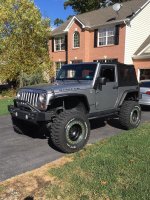
She's pretty. Thanks for the information man I really appreciate it.

Out if curiosity how much extra maintenance is there in the coilover conversion?
 

2014siljk

New member
I just did the Evo 3" lift with king shocks about a month ago. Sitting on 35's. Very happy with it so far, only a 1K smiles on it.
-I did the stage 3, but it is not necessary. I just wanted the stronger control arms and johnny joints.
Very easy install, took me most of a three day weekend. Did it myself in my garage. Did wheels, brakes and fenders the weekend prior.
Some cutting and grinding for myself, because I also installed rockstars.

As Zimm stated, if going this route, dont forget the front driveshaft ( i went with a JE Reel 1350) and a draglink flip.

The EVO manufacturing webpage has all the instructions for their stuff. Read and re read them.
In the write up section are some write ups on front end alignment, setting up control arms and a full list of all the torque settings.
Hit all your nuts/bolts you will be removing the nightbefore with some PB blaster.
If you dont already have taller jackstands you will probably need them. I got a set of 12T off of amazon.
Get a paint pen and mark your bolts as you re torque them when you are done so you dont miss any.

View attachment 283288
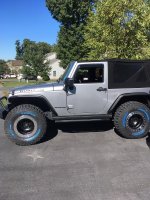
very nice thinking about moving up to that system
 

MericaMade

Active Member
I did the EVO specc'd King Shocks, not coil overs.
Sorry, I meant to ask the community about the coil overs and maintenance. Your setup it very nice. I was doing some searching and read somewhere there is more maintenance involved with the coil overs and they are bolt on but requires cutting and grinding and was trying to get some confirmation.
 

Skeeterbait

New member
If you go to evomfg.com you can download the instructions. EVO-201-1 is the enforcer lift with coil overs. There is cutting/grinding to make the towers for the coil overs fit.
 

MericaMade

Active Member
If you go to evomfg.com you can download the instructions. EVO-201-1 is the enforcer lift with coil overs. There is cutting/grinding to make the towers for the coil overs fit.
Thanks Skeeterbait, I'll jump over there and take a look I appreciate it.
 

MericaMade

Active Member
Well after reading those install instructions I'm pretty sure I'm not going to do coil overs. No that it is much cutting and drilling, just more then I would like to cut off mine.
 

MericaMade

Active Member
Quick question, if I cut the fenders and front bumper will I have any issues running 35's with aftermarket wheels? This would be a temporary solution till I lift it.
 
Last edited:

Skeeterbait

New member
during.jpg

This is in the middle of my install. I did the wheels/tires/breaks and fenders one weekend. Then the lift the next.

So this is 35/12.5 tires on slabs, flat fenders and a full length bumper(state law :mad: ). I drove like this back and forth to work for a week. Only issue was tire rub on the bumper when making sharp turns.

Cutting fenders and bumpers should clear up everything. I would expect some rubbing if you flexed, so for DD you should have know problems.

Put on the front wheels, jack up one side and look for contact, repeat on the otherside. Turn the wheels from lock to lock. Put on the rears, and cycle them up and down. Better to find contact on your driveway then at speed.
 

MericaMade

Active Member
View attachment 283632

This is in the middle of my install. I did the wheels/tires/breaks and fenders one weekend. Then the lift the next.

So this is 35/12.5 tires on slabs, flat fenders and a full length bumper(state law :mad: ). I drove like this back and forth to work for a week. Only issue was tire rub on the bumper when making sharp turns.

Cutting fenders and bumpers should clear up everything. I would expect some rubbing if you flexed, so for DD you should have know problems.

Put on the front wheels, jack up one side and look for contact, repeat on the otherside. Turn the wheels from lock to lock. Put on the rears, and cycle them up and down. Better to find contact on your driveway then at speed.
Nice, thanks for the pictures and advice.
 

MericaMade

Active Member
I have been looking but can not find. Does anyone know where I can find a picture or video walk through of the EVO bolt on coilover kit other then the install directionals they offer?
 

MericaMade

Active Member
So I pulled the trigger yesterday on the Evo enforcer stage 2 drag link flip, with the intentions of going with the coilovers down the road. Right now I just need to run a set of shocks to get me through a few months. Any suggestions?
 
Last edited:

Exodus 4x4

New member
So I pulled the trigger yesterday on the Evo enforcer stage 2 drag link flip, with the intentions of going with the coilovers down the road. Right now I just need to run a set of shocks to get me through a few months. Any suggestions?

The Rancho 5k is what I sell customers that go this route. Fairly cheap but still great shocks that will treat you well until it’s coilover time.


Sent from my iPhone using WAYALIFE mobile app
 

VMSHack

New member
I am curious, this may be a silly question, but with that set up what it the height from door to ground? I am getting up in age and slight back problems. Want to know if a 3 inch will be too high with 35’s.


I just did the Evo 3" lift with king shocks about a month ago. Sitting on 35's. Very happy with it so far, only a 1K smiles on it.
-I did the stage 3, but it is not necessary. I just wanted the stronger control arms and johnny joints.
Very easy install, took me most of a three day weekend. Did it myself in my garage. Did wheels, brakes and fenders the weekend prior.
Some cutting and grinding for myself, because I also installed rockstars.

As Zimm stated, if going this route, dont forget the front driveshaft ( i went with a JE Reel 1350) and a draglink flip.

The EVO manufacturing webpage has all the instructions for their stuff. Read and re read them.
In the write up section are some write ups on front end alignment, setting up control arms and a full list of all the torque settings.
Hit all your nuts/bolts you will be removing the nightbefore with some PB blaster.
If you dont already have taller jackstands you will probably need them. I got a set of 12T off of amazon.
Get a paint pen and mark your bolts as you re torque them when you are done so you dont miss any.

View attachment 283288
 
Top Bottom