You are using an out of date browser. It may not display this or other websites correctly.
You should upgrade or use an alternative browser.
You should upgrade or use an alternative browser.
The Slimer Build Thread
- Thread starter Prime8
- Start date
GCM 2
New member
Does anyone have the nice Grainger one I could borrow? I'd be happy to pay shipping both ways...
Check this thread for someone around you, seems a few guys have bought the Marson. Also there are other models listed.
http://www.jk-forum.com/jk-talk-26/best-rivnut-nutsert-tool-money-249040/
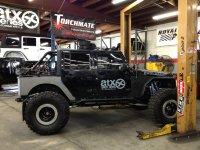
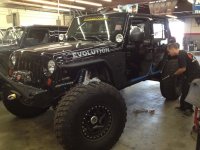
btw, here's my JK at the shop getting skinned.
")
Attachments
Last edited:
Prime8
New member
GCM 2 said:Check this thread for someone around you, seems a few guys have bought the Marson. Also there are other models listed.
http://www.jk-forum.com/jk-talk-26/best-rivnut-nutsert-tool-money-249040/
btw, here's my JK at the shop getting skinned.
But also, thanks for the heads up! Haha.
GCM 2
New member
But also, thanks for the heads up! Haha.
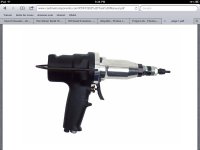
You are welcome. Don't let the install give you anxiety! Off Road evolution is doing this install for me, but I have done my trans cooler mounting points on this JK, armor on my TJ, snorkels on Land Rovers, non-skid deck and armor on HMMWV's...... I have used the cheap ass tool that comes with a purchase of a part and I have used the $1000 plus dollar tool in the attached photo below (basically the same kind EVO uses). The cheap tools that use open end/box end wrenches as part of the equation to set the rivnut, stay the hell away from these! The ultra high end pneumatic pro guns, a one year old could do the rivnut install If the gun is set up. The Marson (or like item) much like the pro's gun is all about the set up and practice on the same thickness of sheet metal prior to the actual event. Get the tool set up right, one maybe two practice installs of the rivnuts and you will have an "aha!" moment. Place some painters tape where the pilot holes will go for the rivnuts (see photo of EVO doing my rock skins, you can see the blue tape), get some big C-clamps or the huge C style vise grips to clamp the skin in place while you do the pilot holes or mark the pilot holes. Remember practice with the tool set up properly. It's easy!
Attachments
Check this thread for someone around you, seems a few guys have bought the Marson. Also there are other models listed.
http://www.jk-forum.com/jk-talk-26/best-rivnut-nutsert-tool-money-249040/
btw, here's my JK at the shop getting skinned.
oh man, can't wait to see it once it's all done :thumb:
Prime8
New member
Greg, what's the painters tape for? Just to have a surface you can mark on for hole locations?
Also, any ideas on how to seal these to the body? Living in Illinois, rust is an issue, and therefore I dont want an open gap between the corners and the body. Any recommendations?
Doesn't Poison Spyder sell rubber sheet to put between the body and the corners? Will that be sufficient?
Also, any ideas on how to seal these to the body? Living in Illinois, rust is an issue, and therefore I dont want an open gap between the corners and the body. Any recommendations?
Doesn't Poison Spyder sell rubber sheet to put between the body and the corners? Will that be sufficient?
GCM 2
New member
Greg, what's the painters tape for? Just to have a surface you can mark on for hole locations?
Also, any ideas on how to seal these to the body? Living in Illinois, rust is an issue, and therefore I dont want an open gap between the corners and the body. Any recommendations?
Doesn't Poison Spyder sell rubber sheet to put between the body and the corners? Will that be sufficient?
The painters tape is for marking the surface and to keep from tearing up the painted surface. As for rust proofing, prior to installing rivnuts, clean, primer and touch up with paint all the raw metal hole edges. You could always apply a nice wide bead of silicone at or near the edges of the new metal skin.
MTG
Caught the Bug
The painters tape is for marking the surface and to keep from tearing up the painted surface. As for rust proofing, prior to installing rivnuts, clean, primer and touch up with paint all the raw metal hole edges. You could always apply a nice wide bead of silicone at or near the edges of the new metal skin.
On my rock skins I found that on some holes the rivnut would scrape the new paint away when inserted. So I put a bead of silicon around the entire edge of the skin. Of course this doesn't prevent it from rusting from the inside (I don't think that would be a problem on the rear 1/4 panel), so I hit the rivnut with silicon too before inserting it into the hole. Between the paint and two layers of silicon there it not much else you can do.
Last edited:
Prime8
New member
HELP!!! I can't get my bumper on! The 1/4 Pounder, besides having lackluster install directions, missed a key component to the install... This silver canister on the driver side of the vehicle sits too low and the bottom edge of the bumper hits it when attempting to slide it on. Therefore, the bumper will not fully seat on the frame rails, it needs to slide back another 0.5-1". What is this canister and how/where can I move it?


Prime8
New member
GCM 2 said:That's the vacuum assist canister, unfortunately you are going to need the relocate kit for that. EVO makes one and a couple of other mfg's
Shit. So that's my only option? Gonna have to strap the stock one back on then...
MTG
Caught the Bug
Prime8 said:Shit. So that's my only option? Gonna have to strap the stock one back on then...
Yes it has to be moved. You also know you have to cut the bottom bar off your stock bumper right?
Prime8
New member
MTG said:Yes it has to be moved. You also know you have to cut the bottom bar off your stock bumper right?
Yes. That's already gone. Otherwise I wouldnt have gotten the bumper on far enough to hit the canister! Haha. I thought I had been doing my due diligence by having Chris email me the install directions ahead of time so I could have all my ducks in a row for a smooth install. But the canister isn't mentioned in the directions...
MTG
Caught the Bug
Prime8 said:Yes. That's already gone. Otherwise I wouldnt have gotten the bumper on far enough to hit the canister! Haha. I thought I had been doing my due diligence by having Chris email me the install directions ahead of time so I could have all my ducks in a row for a smooth install. But the canister isn't mentioned in the directions...
I see that now. Here's something else I don't think is in the instructions...I think you are installing the stinger too so put the bumper on so it's resting on the horns. Take 4 of the bolts and run them from the inside out though the spacer plates and your bumper horns (i.e. they are now installed backwards). Then take the stinger and hang it on these bolts. Then use the remaining bolts to push these bolts back out from the front (don't forget the washers). This leaves the second set of bolts installed the correct direction and ready to install the nuts.
Hopefully that makes sense. Trust me it is so much easier than trying to gets the bolts in from the front. Or using tape to secure the spacer plates.
Good luck!
Last edited:
Something else not in the instructions is how to deal with all the panties that will be thrown at you with this on the front of your jeep.
MTG
Caught the Bug
Notajerryskid said:Something else not in the instructions is how to deal with all the panties that will be thrown at you with this on the front of your jeep.
Yeah. That can be a problem. But you learn to deal.
Prime8
New member
MTG said:I see that now. Here's something else I don't think is in the instructions...I think you are installing the stinger too so put the bumper on so it's resting on the horns. Take 4 of the bolts and run them from the inside out though the spacer plates and your bumper horns (i.e. they are now installed backwards). Then take the stinger and hang it on these bolts. Then use the remaining bolts to push these bolts back out from the front (don't forget the washers). This leaves the second set of bolts installed the correct direction and ready to install the nuts.
Hopefully that makes sense. Trust me it is so much easier than trying to gets the bolts in from the front. Or using tape to secure the spacer plates.
Good luck!
Great tip, thanks brother!
Prime8
New member
Notajerryskid said:Something else not in the instructions is how to deal with all the panties that will be thrown at you with this on the front of your jeep.
Haha, my wife isn't going to like that..
Prime8
New member
Another road block... This 1/4 Pounder install is a nightmare...
In order to be ready for full install once the vacuum relocation kit arrives, I decided to go out and get the sway bar disconnect motor relocated. Taped up my bit at 1/2" just like the directions said, and bored out the hole. Tried to thread in the bolt and it wouldn't grip the ~0.5mm left I'm the hole. So I trimmed it a little more. Still wouldn't grip. The third time it ate right through and bored the hole out completely. So now what...? Had to put the motor back in its original location since it wouldn't have held without any threading...
This install is quickly becoming a huge hassle, I hope the rear carrier doesn't have as many hiccups.